Advanced Layouts provide a greater degree of flexibility than Basic Layouts, allowing you to specify the precise size and / or position of a window to which the layout is applied. You can specify the units in pixels or percentage of screen dimension independently for each value, and can optionally choose to centre horizontally and / or vertically. This how to will guide you through most of the options. Please note that a Pro subscription is required to create or use Advanced Layouts. Trial subscriptions allow Pro features for the duration of the trial.
To create an advanced layout:
- Click the status menu icon for Mosaic
- Select "Preferences..." from the app menu
- Click the "Layouts" tab
- Click the "+" button and choose "New Advanced Layout"
- Type the name for the new layout
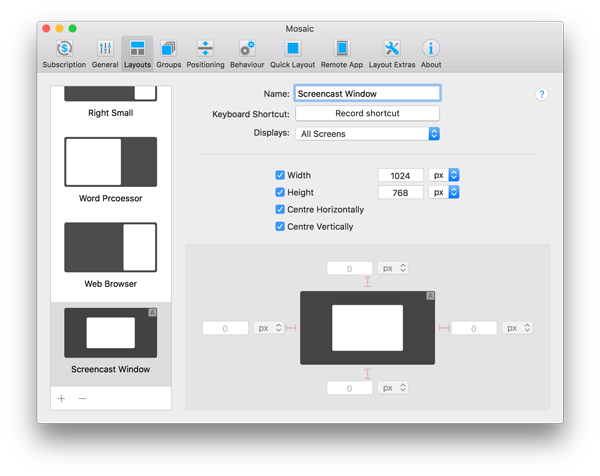
In my example I am going to create an Advanced Layout which sizes a window to 640x480 and positions it 100 pixels from the left and bottom edges of the screen. I will call this Advanced Layout "Screencast Window" which is a typical scenario in which this type of layout may be useful. Having following the above steps and entered the name "Screencast Window" here is what my layout looks like:

By default the Advanced Layout has a fixed size of 1024x768 pixels and is centred on the screen both vertically and horizontally. The greyed panel below the centring options are the constraints to the edge of the screen. If you enable a constraint to the left edge of the screen "Centre Horizontally" will automatically disable, since the layout is not valid if all these options are selected. So to make my layout move a window to 100px from the left and bottom, I click the red constraint markers on the diagram at the bottom for left and bottom constraints and enter a value of 100 for each (leaving the units drop down set to px):

You can see that now the preview shows the window positioned near the bottom left corner of the screen rather than centred. I can now set the width and height to the 640x480 pixels I required:

This is my layout complete. It should be noted that the preview shows what this would look like relative to the current screen, but because this layout uses absolute sizes and coordinates it would look different on a screen with a different resolution and could potentially create a layout that would not fit on the screen.
The "A" icon in the top right corner indicates the layout is an Advanced Layout.
What else can you do with Advanced Layouts?
All the units for width, height and all the edge constraints can be specified independently in px (pixels) or % (screen percentage) which gives a great deal of versatility. For example, you could create a layout which is 50% of the screen height, but 600 pixels wide, and is placed horizontally centred, but 10% of the screen height from the top. It should be noted that the unit px are logical pixels and on a retina screen would therefore be 2 physical pixels.

Comments
0 comments
Please sign in to leave a comment.